Can ZIP Screens Be Installed on Uneven or Out-of-Square Openings?
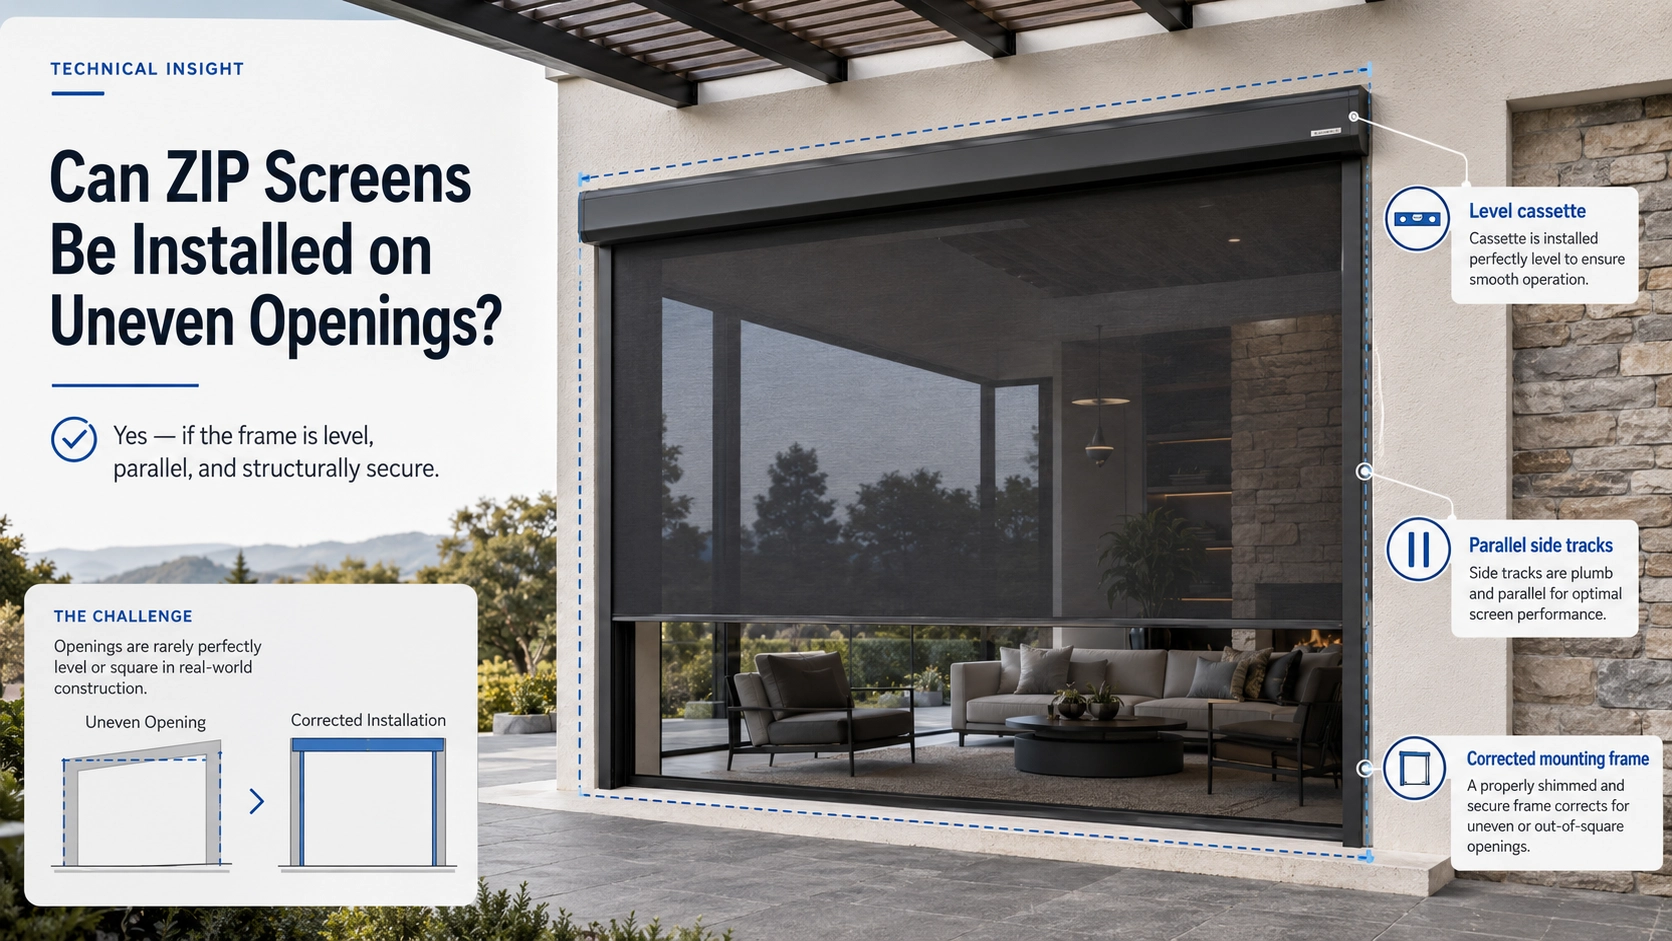
Uneven walls, sloping floors and out-of-square openings are common in older houses, renovated patios, garage openings, pergolas and concrete buildings. These conditions do not automatically prevent ZIP screen installation.
For non-standard openings, one practical installation rule matters more than anything else:
The building opening can be crooked, but the cassette must be level and the two guide tracks must remain straight and parallel.
A ZIP screen should not be forced to follow an irregular wall. The installer must either correct the mounting surfaces or build a separate frame that gives the cassette and guide tracks the geometry they need.
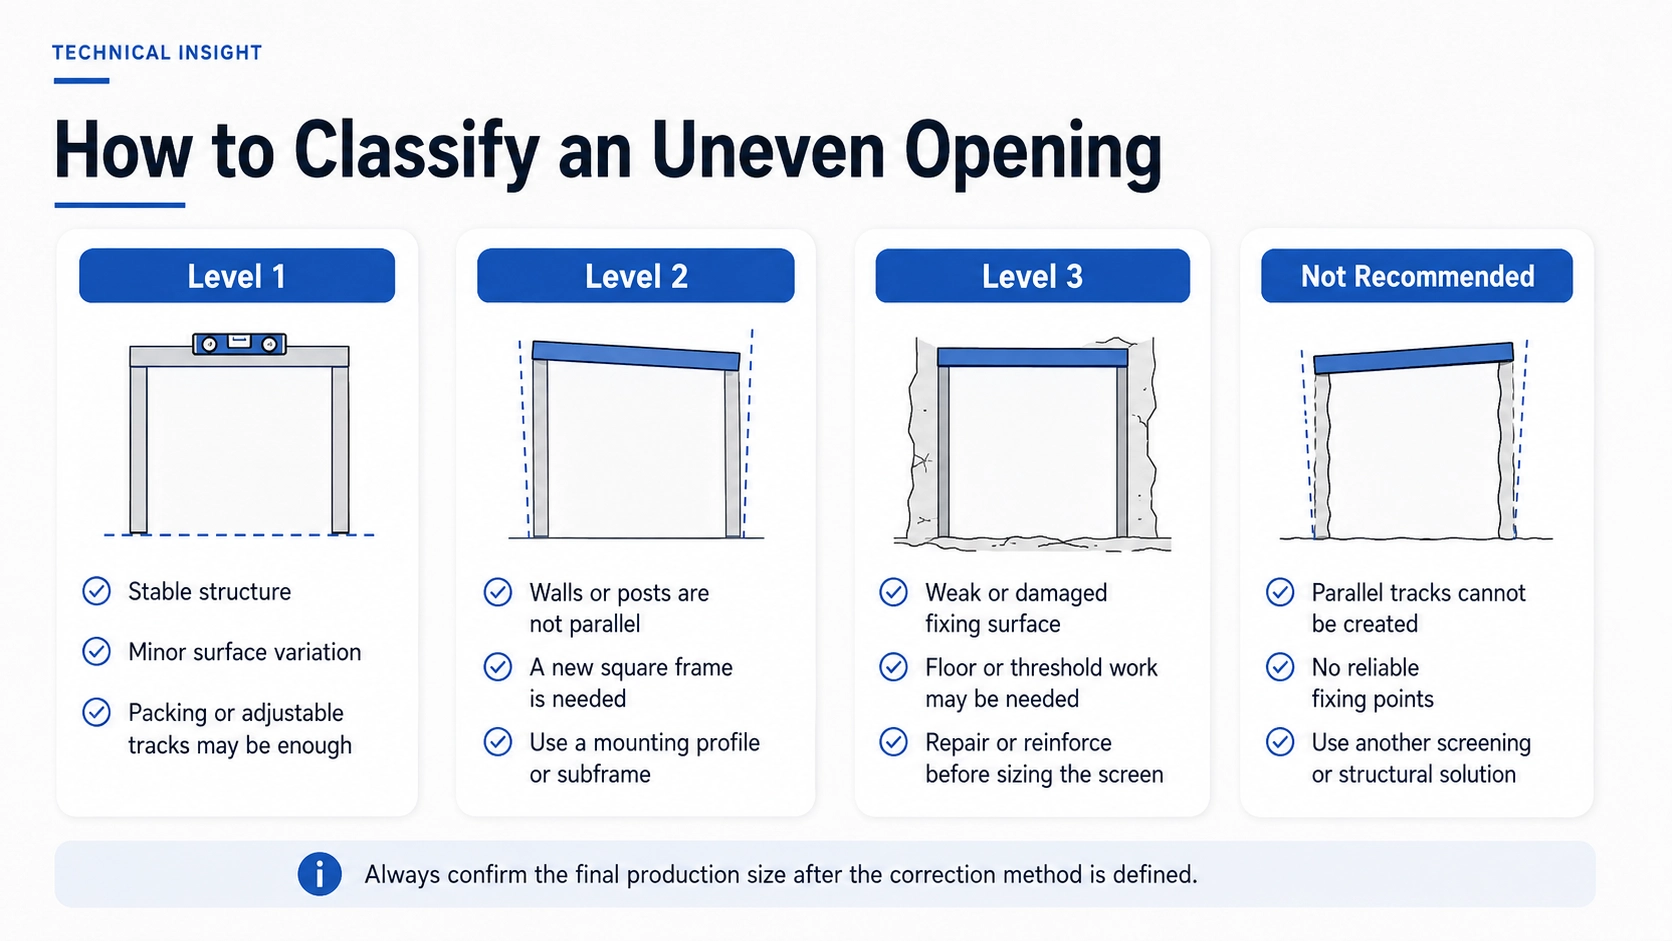
Quick Decision: What Level Is Your Opening?
| Installation level | Site condition | Typical correction | Complexity |
|---|---|---|---|
| Level 1 | The structure is stable, and limited surface variation can be corrected within the selected system's adjustment range. | Packers, continuous backing profiles or adjustable side tracks. | Low |
| Level 2 | The existing walls cannot support straight and parallel tracks without excessive packing. | Head profile, side profiles or a complete aluminum subframe. | Moderate |
| Level 3 | Loose masonry, moving posts, weak cladding or an unusable bottom closing surface affects structural reliability. | Structural repair, reinforcement, threshold preparation or an independent frame. | High |
| Not recommended | A secure and parallel guide arrangement cannot be created. | Modify the opening or select another screening or shading solution. | Project-specific |
There is no single diagonal-difference limit that applies to every ZIP screen. Published installation instructions generally require the completed system to be square and parallel, while the available correction depends on the exact guide design.
For example, the Renson Fixscreen 100 Slim installation instructions show the target relationship as D1 = D2 and H1 = H2. This means the two diagonals and the upper and lower parallel measurements should be as equal as possible before operating the screen.
By comparison, the Rollease Acmeda Zipscreen System Reference Guide states that its adjustable side channels can accommodate an out-of-square opening by up to 20 mm, or 3/4 inch, per side.
For a NewHoo project, measured deviation should be compared with the dimensions, guide structure, adjustment capacity and fixing requirements of the selected NewHoo system.
Start With Three Installation Questions
A ZIP screen installation is normally feasible when all three answers are yes:
- Can the cassette be installed level?
- Can both guide tracks be installed vertically and kept parallel?
- Can the cassette and tracks be fixed to a stable structural surface?
When limited packing or guide adjustment is enough, the opening is generally a Level 1 project.
When a new square frame must be created inside or in front of the original opening, the project becomes Level 2.
When the wall, floor, posts or fixing substrate require repair or reinforcement, it becomes Level 3.
If parallel tracks cannot be created even after reasonable corrective work, a ZIP screen is probably not the correct solution for that opening.
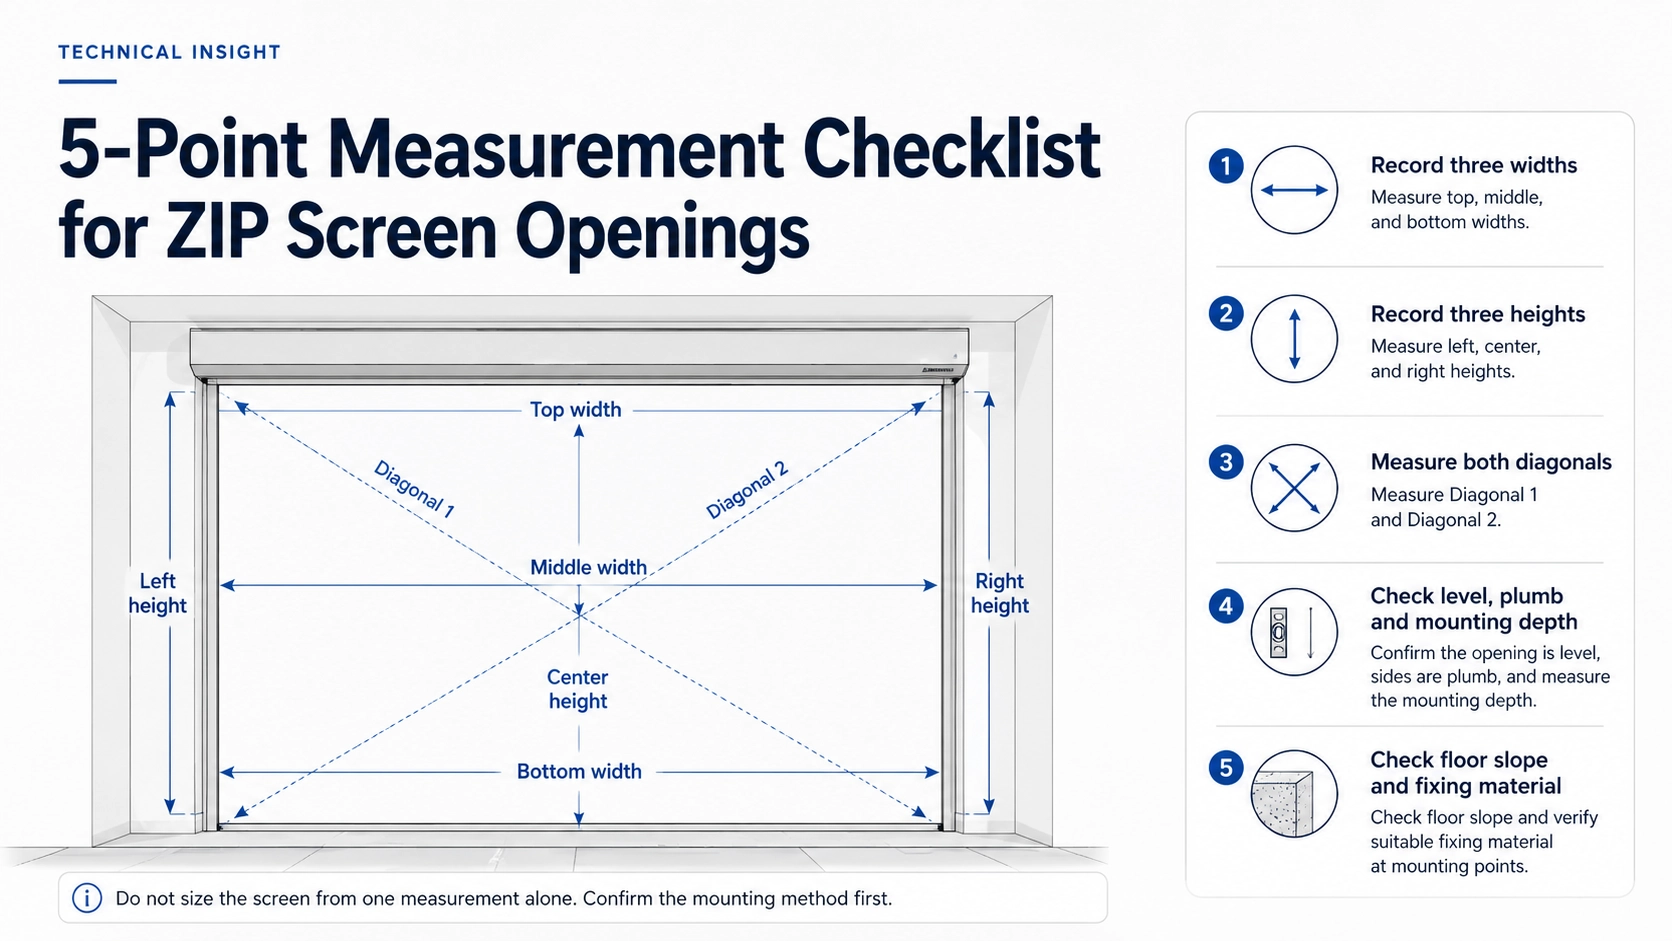
The 5-Point ZIP Screen Measurement Checklist
1. Measure Three Widths
Record the opening width at three positions:
- Top width
- Middle width
- Bottom width
A gradual reduction from top to bottom usually indicates that the walls or posts lean inward. An isolated difference may indicate a projecting brick, tile edge, wall bulge or decorative trim.
2. Measure Three Heights
Record:
- Left height
- Center height
- Right height
Different height measurements may reveal a sloping top beam, drainage fall, raised threshold or local variation in the floor.
3. Measure Both Diagonals
Record:
- Top left to bottom right
- Top right to bottom left
Diagonal difference = larger diagonal − smaller diagonal
The result indicates how far the opening departs from a true rectangle, but it does not determine the installation level by itself.
A 15 mm diagonal difference in a small concrete opening and the same difference in a large flexible pergola structure are not equivalent. Opening size, guide-track length, support stiffness and the available correction method must be assessed together.
4. Check Level, Plumb and Mounting Depth
Inspect:
- The top cassette mounting surface
- Both guide-track fixing surfaces
- Whether the walls lean inward or outward
- Whether the left and right surfaces lie in the same plane
- Local recesses or projections behind the future tracks
A front-view photograph may not show that one post sits farther forward than the other. Use a laser, string line or long straightedge where possible.
5. Check the Floor and Fixing Material
Record:
- Floor slope
- Drainage channels
- Steps and thresholds
- Concrete, brick, steel, aluminum or timber substrate
- Cracks, loose mortar, cladding or insulation
- Top, middle and bottom widths recorded
- Left, center and right heights recorded
- Both diagonals recorded
- Top, side and floor photographs taken
- Fixing material identified
Do not automatically order the screen using the smallest measurement. First confirm whether the screen will be inside-mounted, face-mounted, fixed to pergola posts or installed inside a corrective subframe.
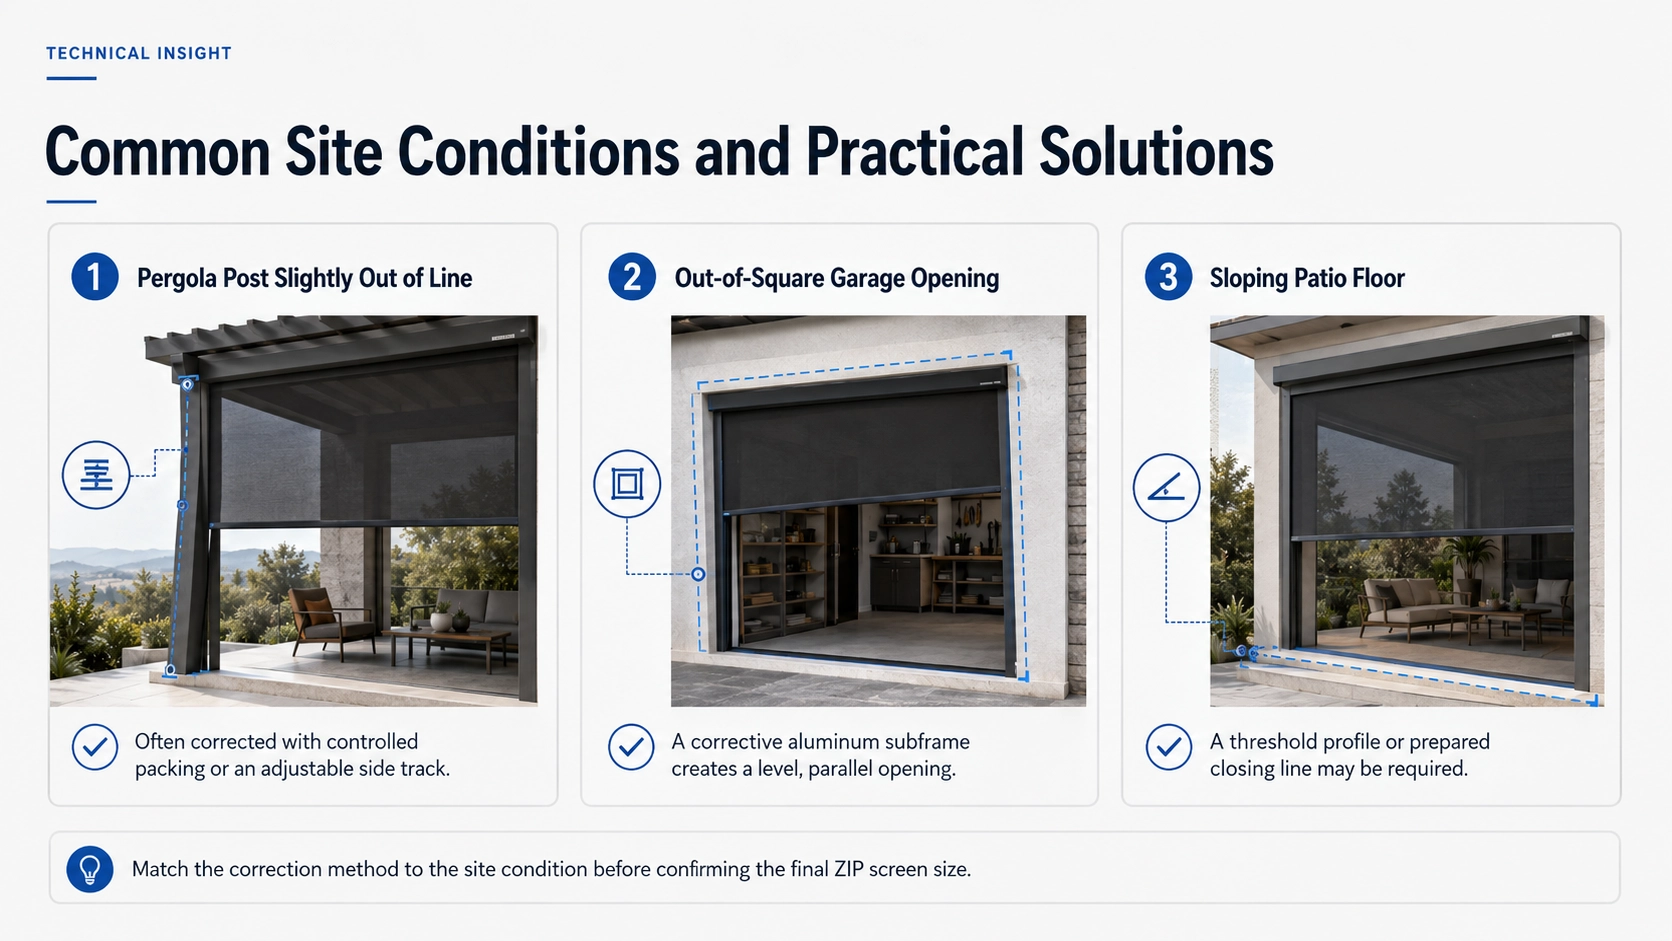
Level 1: Direct Correction May Be Possible
A Level 1 opening is not perfect, but the underlying structure is stable and the guide tracks can be aligned without substantial building work.
Typical conditions include:
- Local surface irregularity
- Slight wall or post inclination
- A top surface that can be leveled with controlled packing
- Sound concrete, brick, metal or timber fixing points
- A floor condition that can be handled by the selected bottom seal
Typical Level 1 Solutions
Installers may use:
- Rigid plastic packers
- Aluminum or stainless-steel shims
- Continuous backing profiles
- Adjustable side tracks
- Minor sealing and finishing
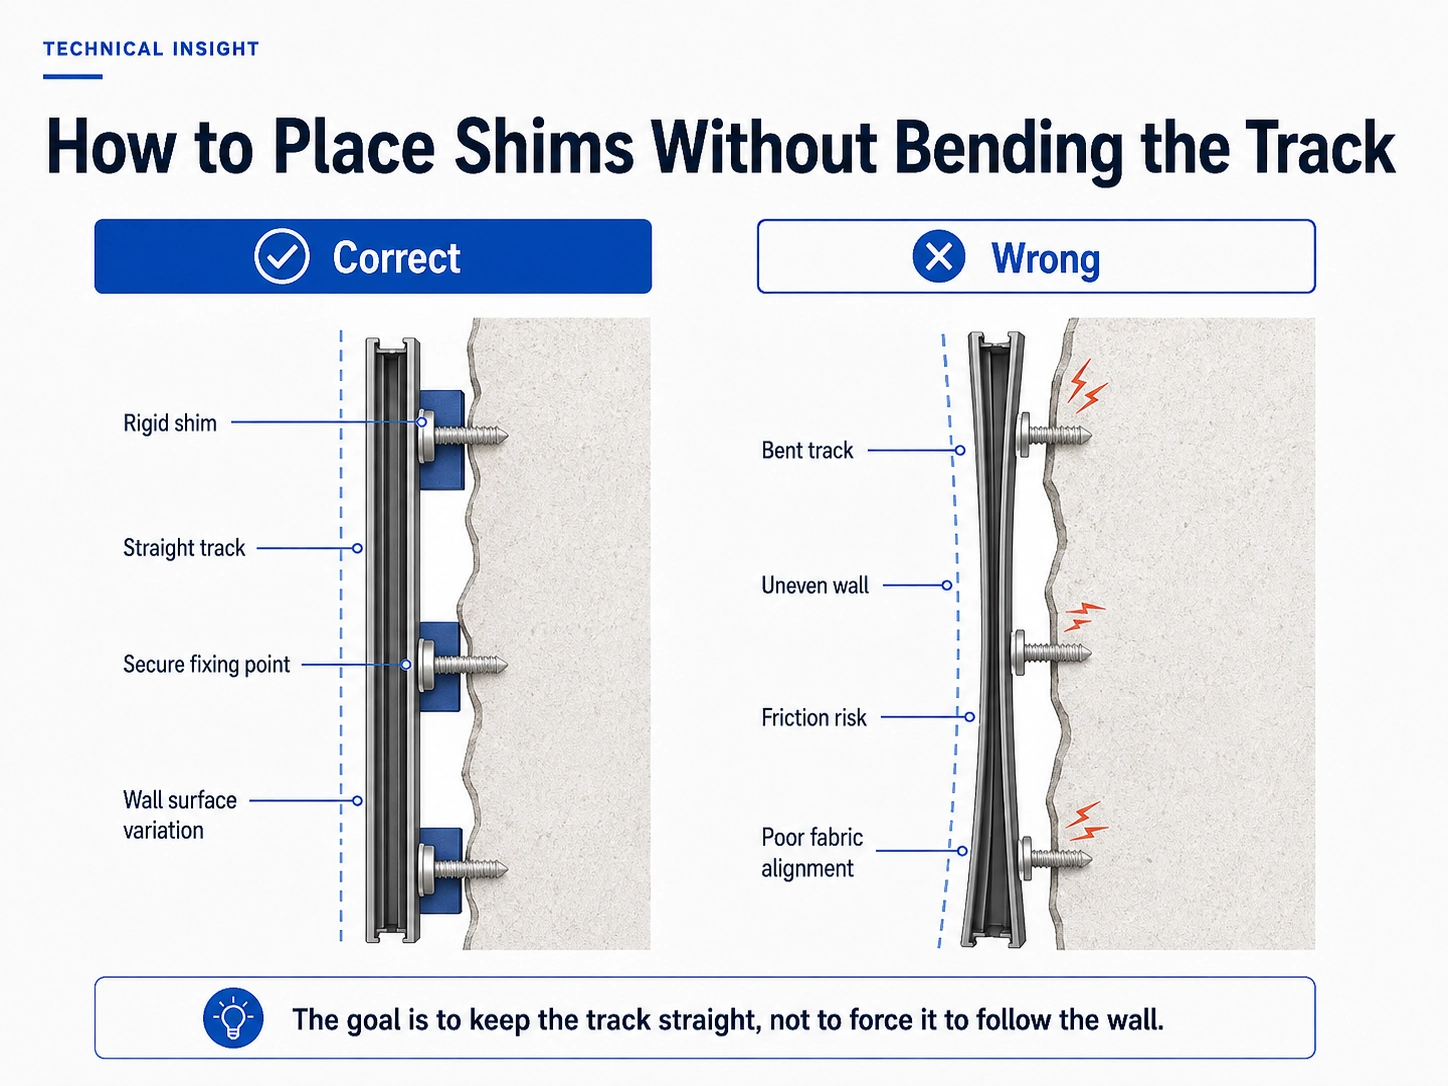
The purpose of packing is to keep the guide straight. It should not make the guide follow the shape of the wall.
A common mistake is tightening a straight aluminum track directly against uneven masonry. The guide may appear correct at the top and bottom but bow inward between fixing points. This local deformation can cause fabric friction, diagonal wrinkles and abnormal operating noise.
Packers Must Support the Track
Local packers can work when only a small number of fixing positions are recessed. A continuous backing profile is generally more appropriate when the entire wall surface is uneven.
Avoid corrections that:
- Leave long track sections unsupported
- Reduce fastener engagement
- Create excessive leverage on anchors
- Pull the guide into a curved shape
- Hide loose or damaged masonry
Fixing distances are system-specific. For one guide configuration, the Renson side-guide drilling instructions specify that the first drilling position should be no more than 250 mm from the top, with a maximum of 750 mm between drilling positions.
These figures demonstrate why installers should follow the manual for the selected guide profile rather than copying one fixing interval across different systems or manufacturers.
Adjustable Side Tracks
An adjustable side track may help where:
- One pergola post is slightly offset
- A wall has limited continuous inclination
- Fabric-edge positioning requires fine adjustment
- The supporting structure remains strong and stable
NewHoo's adjustable side rail ZIP screen is intended for limited wall deviation and installation adjustment.
It should not replace:
- Structural reinforcement
- A required corrective subframe
- Major wall correction
- Reliable guide-track spacing
- Secure structural fixing points
The actual compensation capacity should be confirmed against the selected NewHoo configuration and project dimensions.
Level 1 Cost and Scope
Level 1 normally adds:
- Additional alignment time
- Packers or backing material
- Minor finishing work
- A possible adjustable-track upgrade
The work remains within normal ZIP screen installation.
Level 2: A Corrective Frame Is Recommended
A Level 2 opening has stable surrounding construction, but the existing geometry cannot support straight and parallel tracks through local packing alone.
Typical conditions include:
- Walls leaning in different directions
- Left and right fixing surfaces at different depths
- Rough or wavy masonry
- A sloping concrete head beam
- Long unsupported spaces behind the proposed tracks
- Several screens that need to share one alignment line
Trying to correct these conditions with increasingly thick individual packers can leave guide tracks inadequately supported and create additional leverage on the fasteners.
Consider a structurally sound garage opening where the bottom is wider than the top, the diagonals are noticeably different, the concrete sides are not parallel and the top beam is slightly sloped.
Installing the guide tracks directly against the concrete would transfer the building error into the ZIP screen. A rectangular aluminum subframe creates a level cassette line, two parallel guide positions, a controlled finished opening and more reliable fixing points.
How a Subframe Works
- Measure the original building opening.
- Design a level and square aluminum or steel frame.
- Anchor the frame to reliable structural points.
- Pack and seal gaps between the new frame and the building.
- Confirm the completed internal opening.
- Manufacture the ZIP screen to the corrected dimensions.
The required frame section and anchor arrangement depend on:
- Opening width and height
- Product weight
- Wind exposure
- Unsupported profile length
- Fixing substrate
- Corrosion environment
- Installation position
One profile size and one fixing interval should not be applied to every project.
Level 2 Cost and Scope
Level 2 normally adds:
- Aluminum or steel profiles
- Frame fabrication
- Additional anchors
- Detailed site measurement
- Longer installation time
- Cover profiles or finishing sealant
It is more involved than standard installation but does not necessarily require major structural reconstruction.
Level 3: Structural Preparation Is Required
Level 3 is not defined by diagonal difference alone. It applies when the installation problem extends beyond track alignment and into the building structure.
Warning signs include:
- Loose brick or mortar
- Cracked or powdering concrete
- Rotting timber
- Moving pergola posts
- Detached render or cladding
- No reliable fixing point behind exterior insulation
- A large floor step
- An unusable bottom closing line
An old brick opening may have a substantial diagonal difference, but the more serious problem is often mortar that breaks away during test drilling.
A perfectly square aluminum frame will still be unreliable if it is anchored into unstable masonry. The substrate should be repaired or bypassed with a properly supported independent frame before the final ZIP screen dimensions are confirmed.
Sloping Floors
Bottom seals can accommodate surface variation, but their ability depends on the selected seal design.
The Ziptrak outdoor product guide lists standard, large and extra-large weather strips of 15 mm, 30 mm and 60 mm. It describes the 60 mm option as providing additional flexibility for sloping floor conditions and also lists a custom-made skirt option.
When floor variation exceeds the selected seal's capacity, possible solutions include:
- A level threshold profile
- A dedicated bottom closing rail
- Local floor preparation
- A raised closing line
- Dividing the opening into separate bays
Drainage must remain functional. A level threshold should not create water retention against the building.
Level 3 Cost and Scope
Level 3 may require:
- Masonry repair
- Structural reinforcement
- Independent steel or aluminum framing
- Floor or threshold work
- Building-envelope work
- Coordination with another contractor
At this level, the work is partly a construction project rather than only a shading-product installation.
Why Large Openings Need Separate Review
The same deviation becomes more significant as the ZIP screen becomes wider or taller.
Large openings introduce:
- Greater roller-tube deflection risk
- Higher bottom-bar loads
- Longer guide tracks
- Larger wind forces
- Greater demands on anchors and support frames
Manufacturer installation requirements may also change as the dimensions increase.
For one specific configuration, the Renson head-box fixing instructions require additional central securing when the screen width exceeds 3 m to reduce the risk of head-box sagging.
This is a product-specific requirement, but the engineering principle is widely relevant: an extra-wide screen cannot be assessed only by checking whether its opening appears square.
NewHoo offers standard, adjustable, connectable, extra-wide and extra-high windproof roller blind systems . The support frame and corrected opening should be defined before the final system is selected.
When a ZIP Screen Is Not Recommended
A ZIP screen should not be installed directly when:
- The supporting structure continues to move
- Parallel guide tracks cannot be created
- Reliable structural fixing points are unavailable
- The opening contains tight curves or changing angles
- The bottom closing line cannot be prepared
- The selected system is unsuitable for the required size
- The support frame cannot carry the expected loads
Alternative directions may include:
- Modifying the building opening
- Building an independent support structure
- Dividing one large opening into several bays
- Using a larger-rated or connectable NewHoo system
- Installing a fixed architectural screen
- Selecting another custom shading solution
A custom ZIP screen should not be used to conceal an unresolved building defect.
Confirm the Installation Level Before Ordering
Do not move directly from rough wall measurements to production dimensions. Use the following process:
- Record three widths, three heights and both diagonals.
- Inspect the cassette and guide-track fixing surfaces.
- Classify the project as Level 1, Level 2 or Level 3.
- Select the correction method.
- Define or construct the subframe where required.
- Confirm the completed mounting opening.
- Approve the final production dimensions.
For Level 2 projects, the screen should normally be sized to the completed corrective frame rather than the original crooked opening.
Frequently Asked Questions
Do ZIP screen openings need to be perfectly square?
No. Limited building variation may be corrected, but the installed cassette and guide tracks must form a sufficiently level, straight and parallel operating frame.
Should I use the smallest width as the production width?
Not automatically. The final width depends on the mounting method, guide-track design, installation clearances and whether a corrective subframe is required.
Can adjustable side tracks correct a crooked wall?
They may compensate for limited wall deviation and help fine-tune fabric-edge alignment. They cannot correct major structural deformation or replace a required support frame.
Can ZIP screens close on a sloping floor?
Minor variation may be handled by a suitable bottom seal. Larger slopes, steps or drainage channels may require a threshold profile, dedicated closing rail or local floor preparation.
Are ZIP screens fully waterproof?
ZIP screens can improve shading and weather protection but should not automatically be treated as fully waterproof building enclosures. Final performance depends on the guide structure, seals, threshold, drainage and site exposure.
Submit Your Opening for a Feasibility Check
Before ordering a custom ZIP screen, take one full front photograph, one guide-track fixing photograph and one floor or threshold photograph. Submit them with three width measurements, three height measurements, both diagonals and the fixing material.
NewHoo can use this information to provide a preliminary Level 1, Level 2, Level 3 or not-recommended assessment before final production dimensions are confirmed.
Conclusion
An uneven or out-of-square opening does not automatically prevent ZIP screen installation.
- Use Level 1 correction when the structure is stable and the selected system can absorb limited variation.
- Build a Level 2 corrective frame when the original walls cannot support straight and parallel guide tracks.
- Complete Level 3 structural preparation when the wall, floor, posts or fixing substrate are unreliable.
- Select another solution when a stable and parallel guide arrangement cannot be created.
The goal is not to make the ZIP screen follow a crooked wall. The goal is to provide a level cassette, two straight and parallel tracks, and a secure structural load path before manufacturing begins.
What Is the Maximum Width of an Outdoor Roller Blind?
Pergola ZIP Screen Selection Guide: How to Choose the Right System Based on Size, Wind, Fabric and Motor Configuration
Related Article